Learning Objectives
After completing this lesson, you’ll be able to:
- Create an FME Flow Workspace App.
- Demonstrate sharing workspaces with non-FME users through Flow Apps.
- Open and run a Workspace App.
In this lesson, you will:
- Optional: Watch a demonstration video (if you have not attended the live training).
- Scroll down to read the activity instructions below and follow the steps in your lab.
- Complete the quiz at the end of this lesson.
- Click 'Next' to mark the lesson complete.
Resources
- Starting workspace | C:\FMEData\Workspaces\DeployWorkflowsWithFMEFlow\share-workspaces-as-apps.fmw
FME Flow Apps
Sharing a repository is an excellent way to share workspaces with other users who also have access to FME Flow. However, what if you want to allow anyone to submit a job without requiring an FME Flow account? Or what if you'd like to control the input parameters a user can submit with a job? Or perhaps you'd like to allow another user to trigger your automation without giving them the ability to edit the automation?
You can accomplish all these using FME Flow Apps, no-code web applications accessed from a web browser that allow non-FME users to access and use FME functionality. Workspace Apps will enable you to share and run FME workspaces as web apps. Workspace Apps are similar to the Run Workspace page, but FME hosts them as standalone web pages that users can access optionally without an FME Flow account. Similarly, Automation Apps will enable you to trigger an Automation. Gallery Apps act as landing pages to link to other Apps and websites.

This lesson will cover sharing workspaces with Workspace Apps. For more information on Automation Apps, see Getting Started with Automation Apps and Job Orchestration in Automations. For more information on Gallery Apps, see Getting Started with Gallery Apps. Check out the Create Data Integration Apps learning path for Flow Apps content on the FME Academy.
Creating Workspace Apps
To create a Workspace App, click Create Workspace App under the Flow Apps menu. Then you'll fill out a form to select and configure the workspace to run in the app.
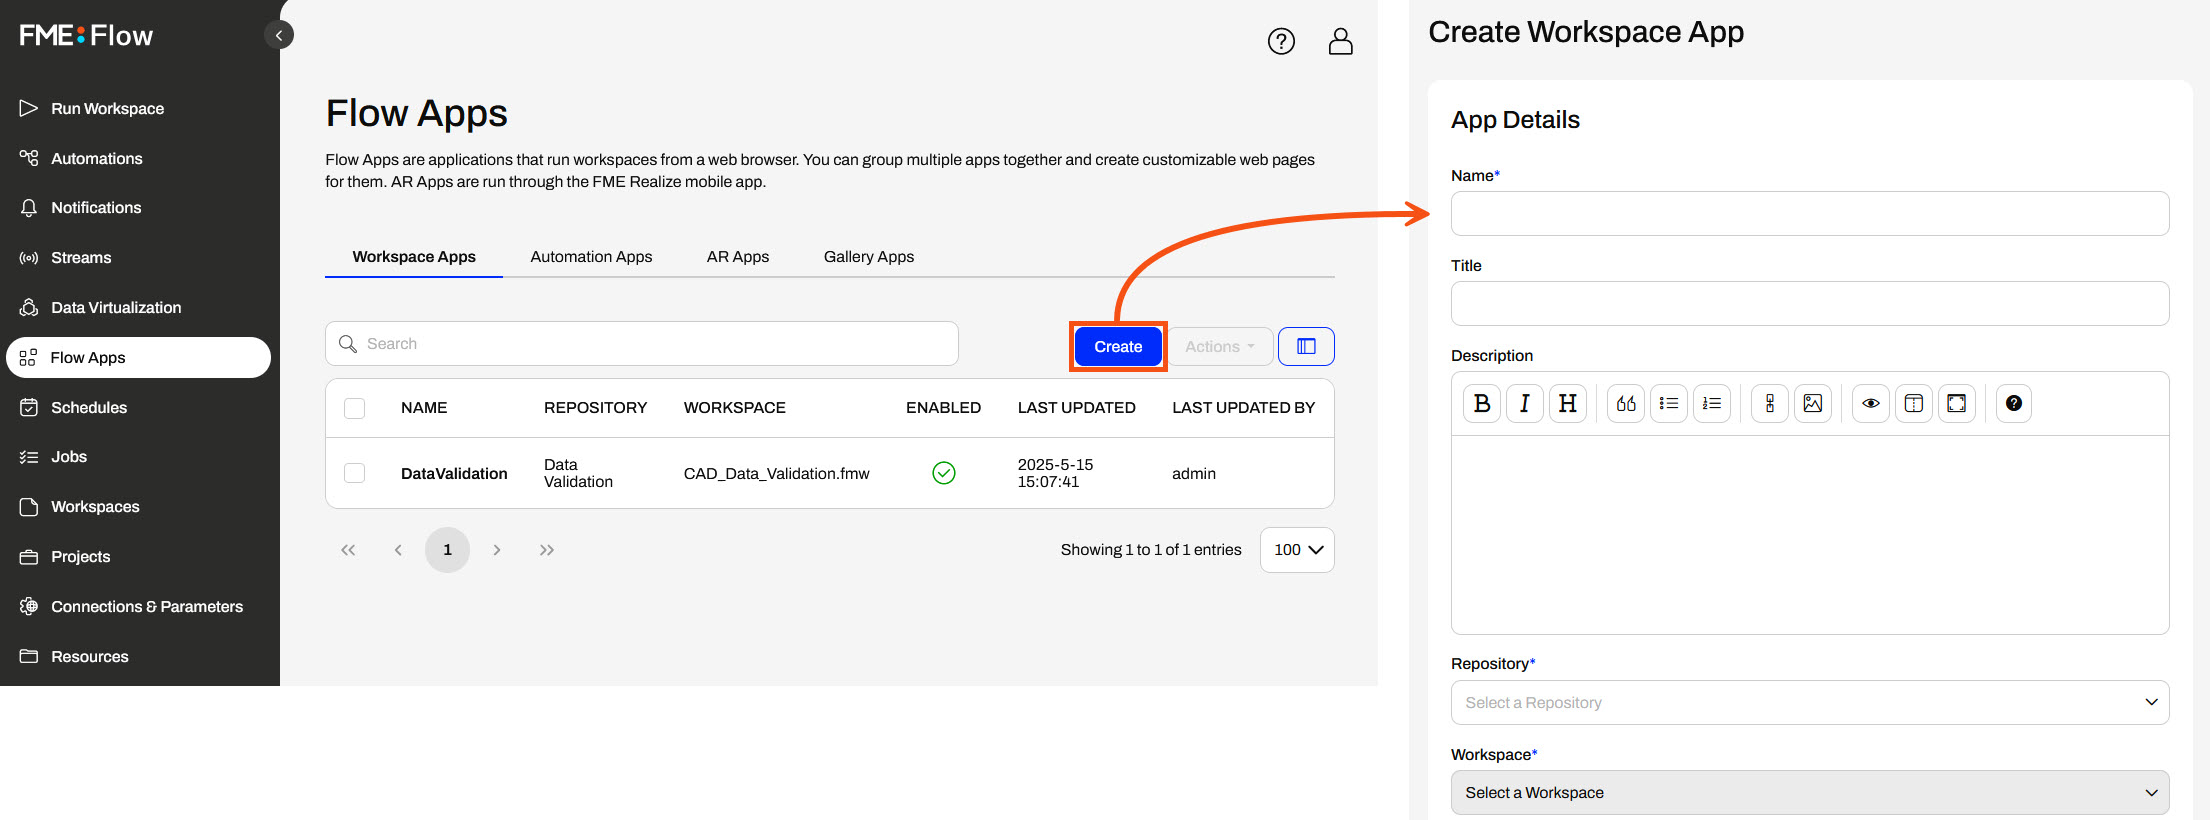
After you provide your app with a name, title, and description, you must select the workspace and service in which it will run. Workspace Apps can run only one workspace with one transformation service at a time.
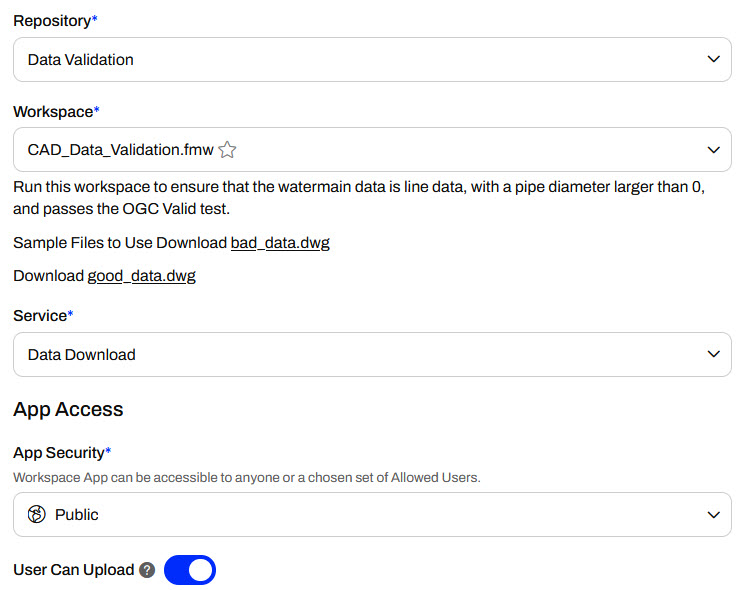
Under App Access, you can set App Security to Public or Private. If your app is public, anyone with the app's link can access it without logging into FME Flow, as long as there's no network or firewall interference between them and your FME Flow. If your app is private, you will also need to select the users or roles who can access it. These users will be able to access the app after logging into FME Flow.
The User Can Upload setting controls whether app users can upload temporary data to serve as input to the app. If your app takes source data from end users, you will likely need this setting enabled so they can upload their data.
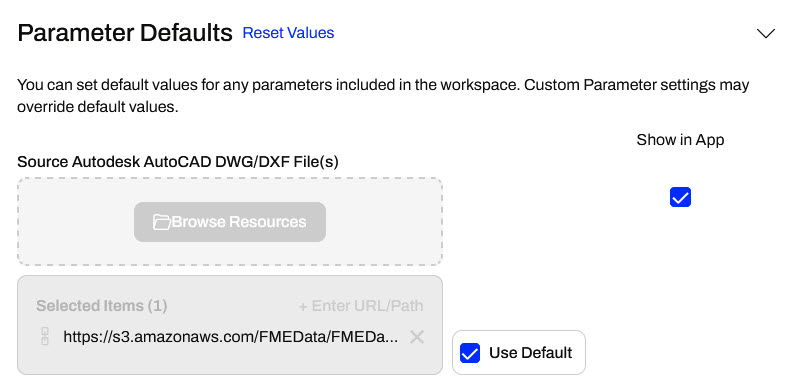
The Parameter Defaults section displays the workspace's user parameters and lets you set different default values or hide the parameter from users in the app. If the Show in App option is disabled, end users will not be able to alter the parameter setting, and the workspace will run using the default value you provide here.
The following sections are:
- Dynamic Parameter Configuration: Dynamic Parameters let you configure Flow App parameters at runtime using external JSON data. You can set default values or dynamically populate options, enabling flexible app configurations at runtime.
- Resource Permissions: App users may browse and select data in FME Flow Resources to which they have permissions.
- Connection Permissions: If the workspace requires a database or web connection, you may specify which connections app users may access and use to run the workspace.
- Customize: Flow Apps offer customization options that let you upload banners, logos, and icons, add text, or change colors to replace the default FME branding.
This course does not focus on these three sections. For more information and training on them, check out the Create Data Integration Apps learning path.
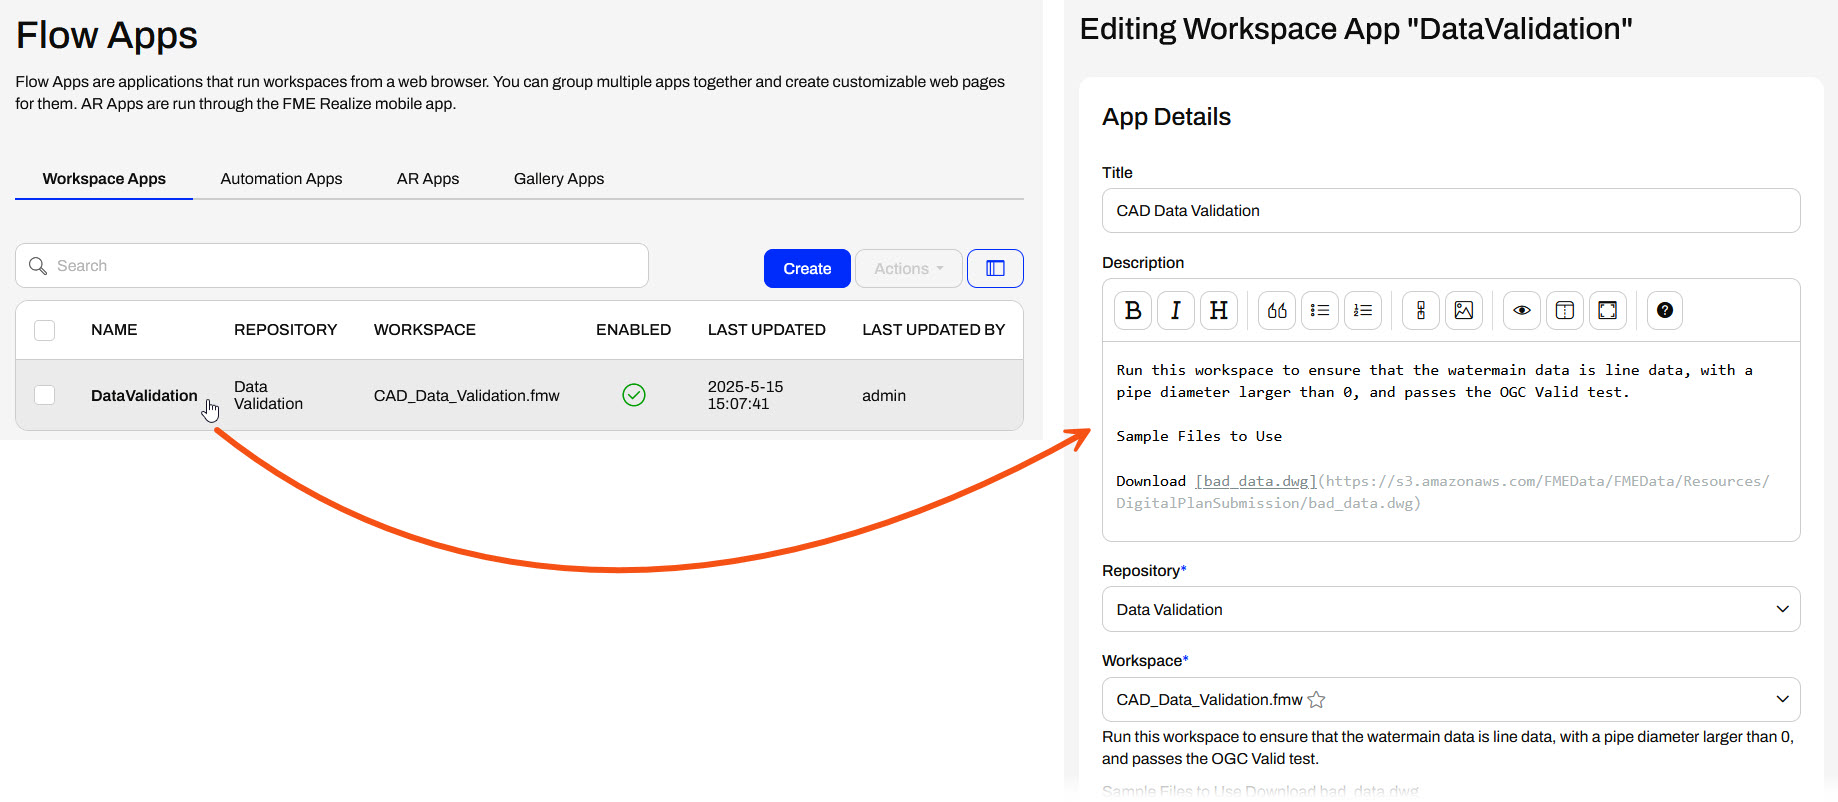
After you create your app, you may return to it for editing by selecting it from the Workspace Apps page. You can edit almost all app settings after you originally create the app.
Accessing and Sharing Apps
After you create your app, FME Flow will display the app URL and some details. You may copy the URL to share it, open the app in another browser tab, or return to edit the app.
The Workspace App link opens a simplified Run Workspace page where you or your end users can configure and run the workspace.
Exercise

Jennifer is creating a public self-serve data portal for users to access and download data. Jennifer must share an FME workspace with the public to configure and run the portal. However, most people do not have any FME experience, and even if they did, how would Jennifer's organization give everyone an FME account to access FME Flow? To overcome this, Jennifer decides to use an FME Flow Workspace App to share the workspace and make it publicly accessible.
For this exercise, follow these steps to create an FME Flow App to share a workspace publicly.
1) Open Starting Workspace
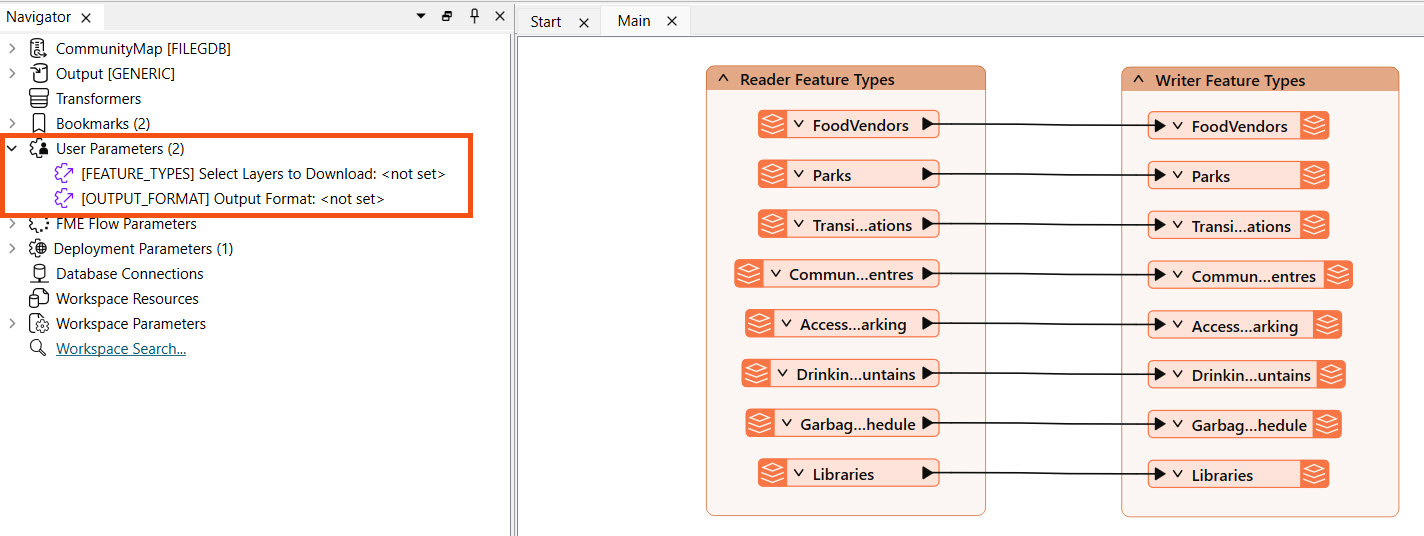
Open the starting workspace in FME Workbench (C:\FMEData\Workspaces\DeployWorkflowsWithFMEFlow\share-workspaces-as-apps.fmw). The workspace reads data from a CommunityMap file geodatabase and writes it using a generic writer. Jennifer has already created two user parameters: FEATURE_TYPES to allow the user to select the feature types from the database to access, and OUTPUT_FORMAT to control the output data format.
2) Publish to FME Flow
Publish the workspace to FME Flow, put it in the Training repository, and register it with both the Data Download and Job Submitter services.
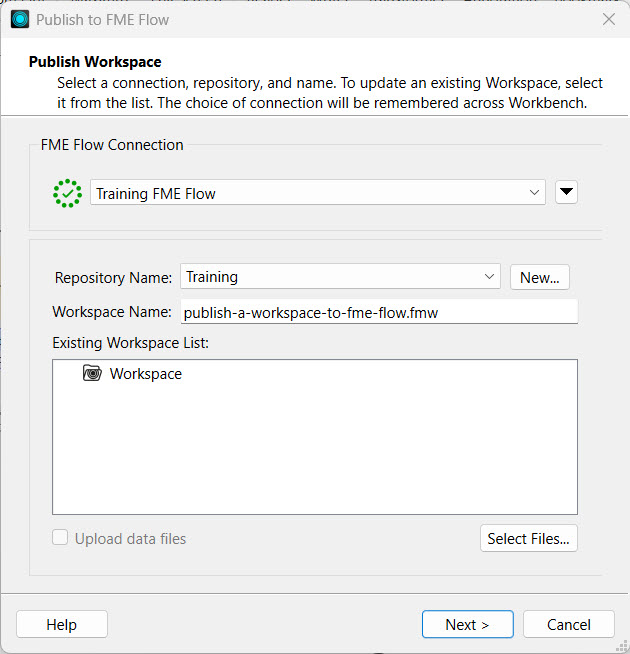
Publish to FME Flow
Once you build your workflows in FME Workbench, you need to transfer them to FME Flow through the publishing process. To publish a workspace to FME Flow, you need to complete all the steps in the publishing wizard.
1. Click Publish in the FME Flow Connection toolbar. The publishing wizard window will open.
2. Confirm your FME Flow Connection lists the correct connection and successfully connects to your FME Flow.
3. Select a repository to house the workspace on FME Flow from the drop-down options. To create a new repository, click New and enter its details.
4. Optionally, you may Upload data files to publish the workspace's source data files to FME Flow along with the workspace. You can control which files to upload from the Select Files... option.
5. Click Next to move on to the next step.
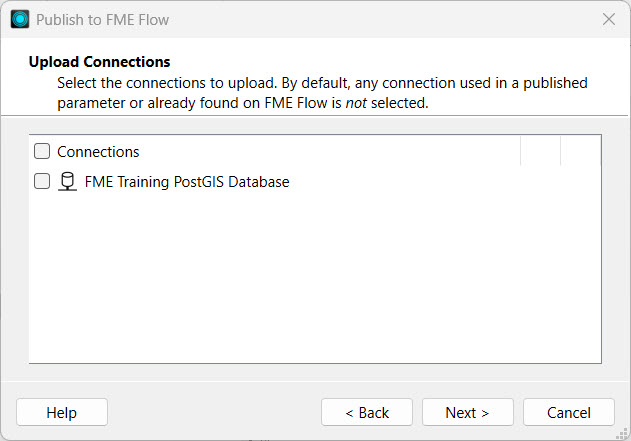
6. If your workspace uses any connections, the Upload Connections section will appear. You can select whether to publish the connections to FME Flow.
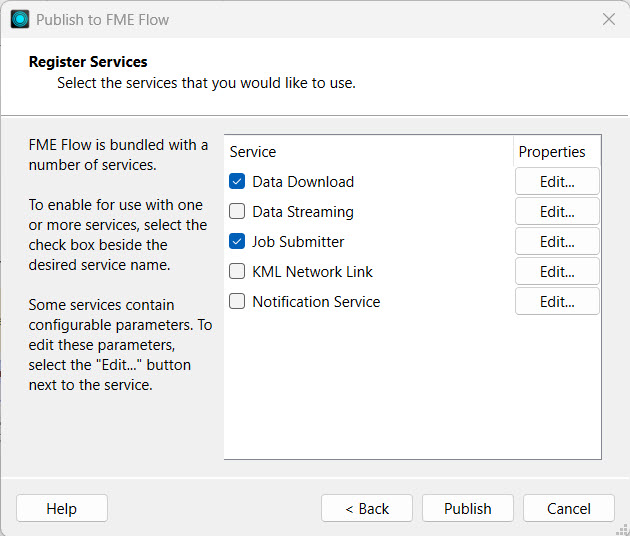
7. Register Services is the last publishing step. Select the transformation services you want your workspace to be able to use on FME Flow.
8. Click Publish.
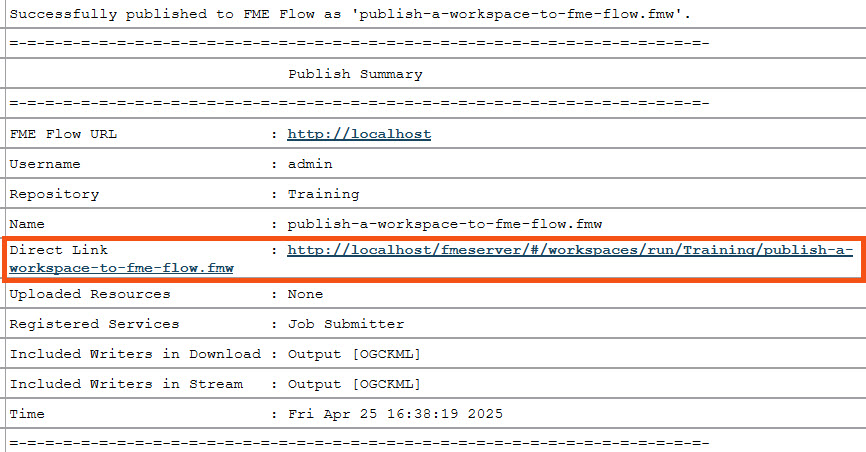
9. The translation log generates a summary of publishing and provides a direct link to open the workspace on FME Flow.
3) Run Workspace on FME Flow
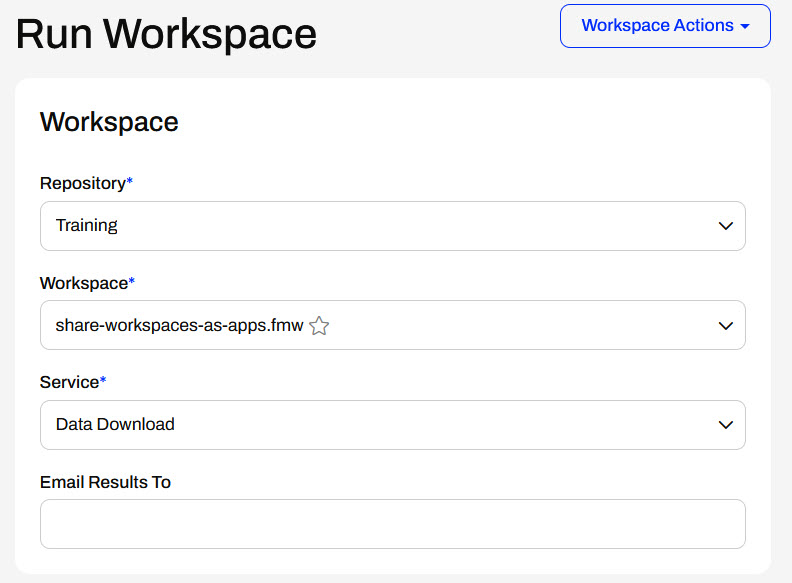
To ensure the workspace works as expected on FME Flow, go to the Run Workspace page and configure it to run. Use the Data Download service, select a few layers to download, and select an output format.
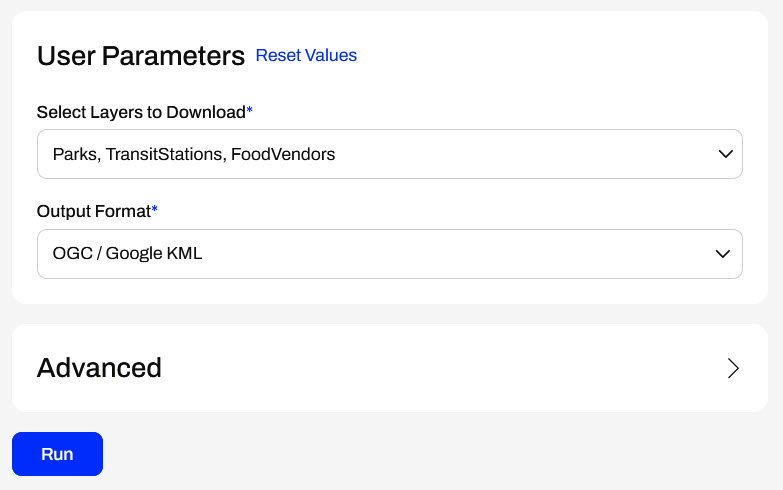
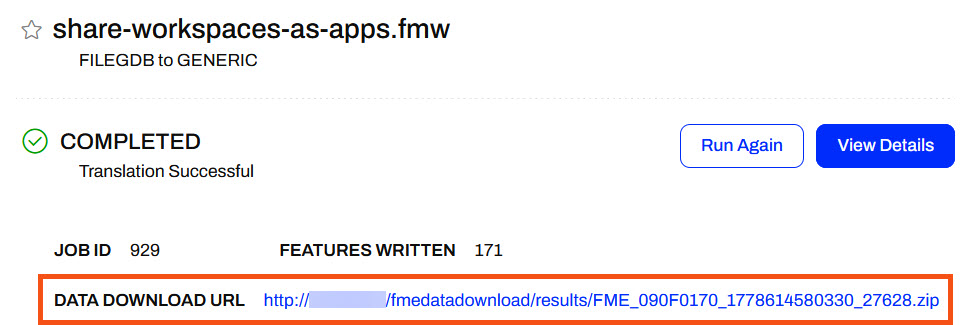
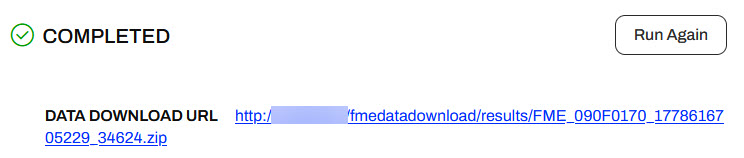
Click Run, and once FME Flow processes the workspace, click the Data Download URL to download and inspect the data.
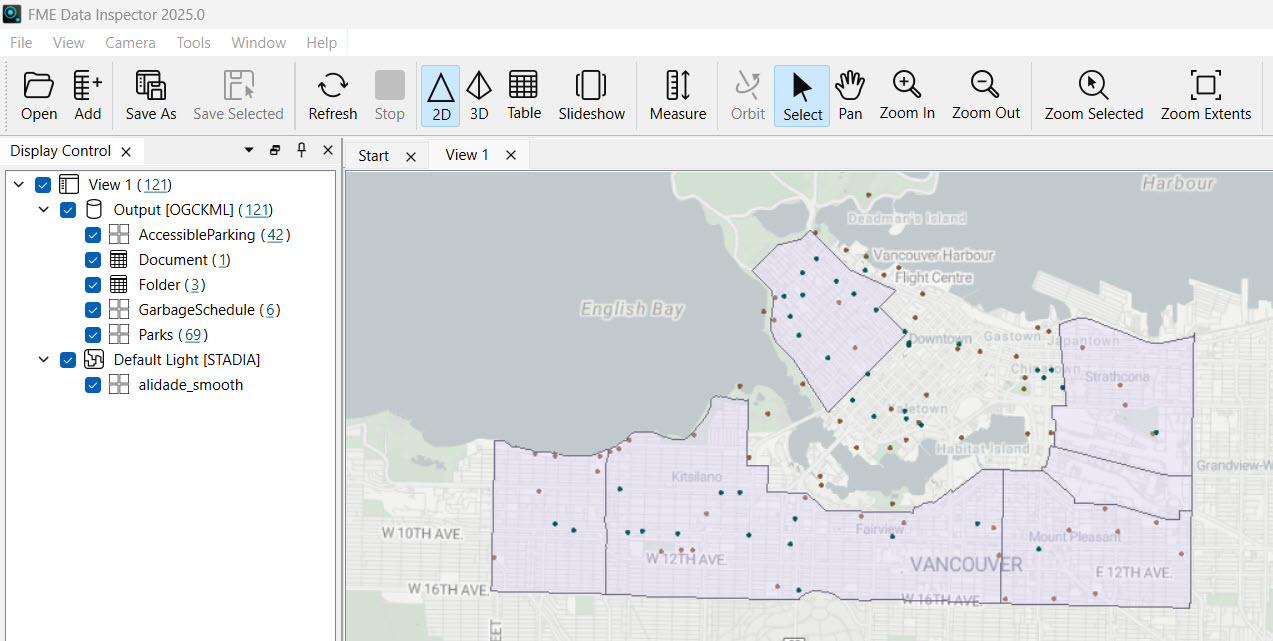
Extract the downloaded data zip folder and inspect the data in FME Data Inspector to confirm the workspace runs as you expect, then you can safely turn it into a Workspace App now.
4) Create Workspace App
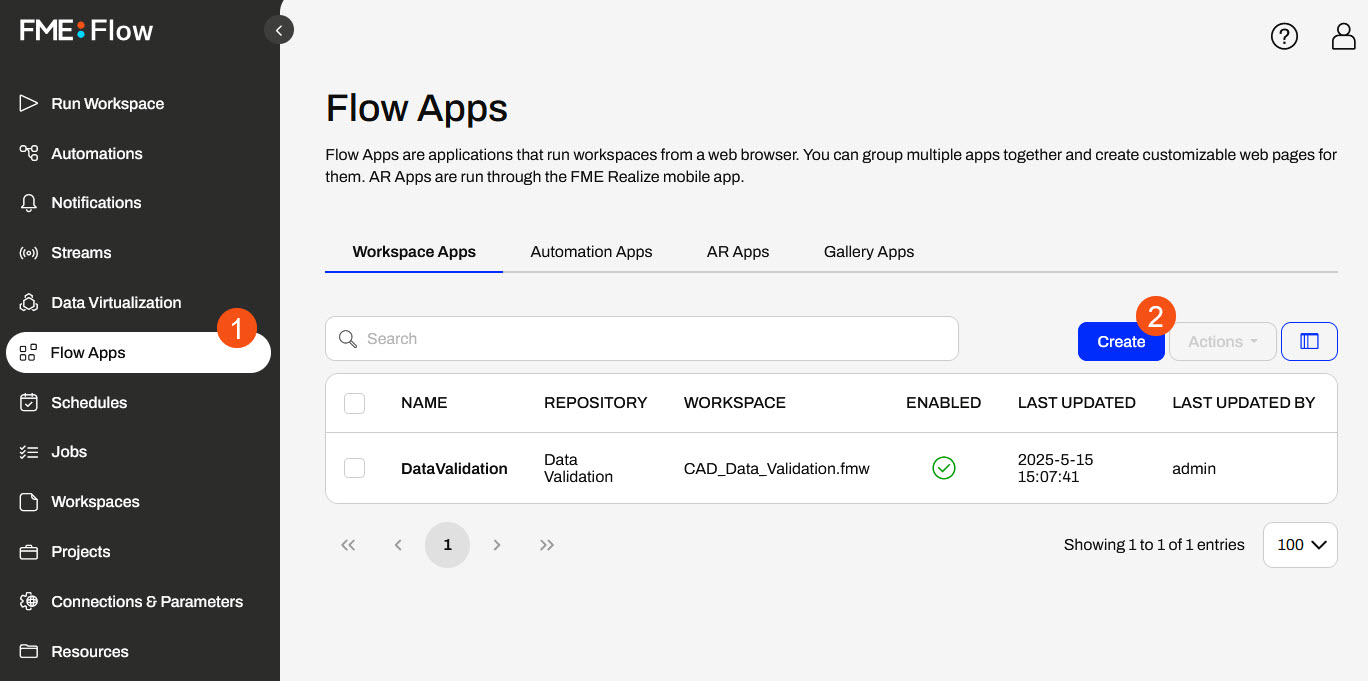
Navigate back to FME Flow, open Workspace Apps, and click Create to make a new one.
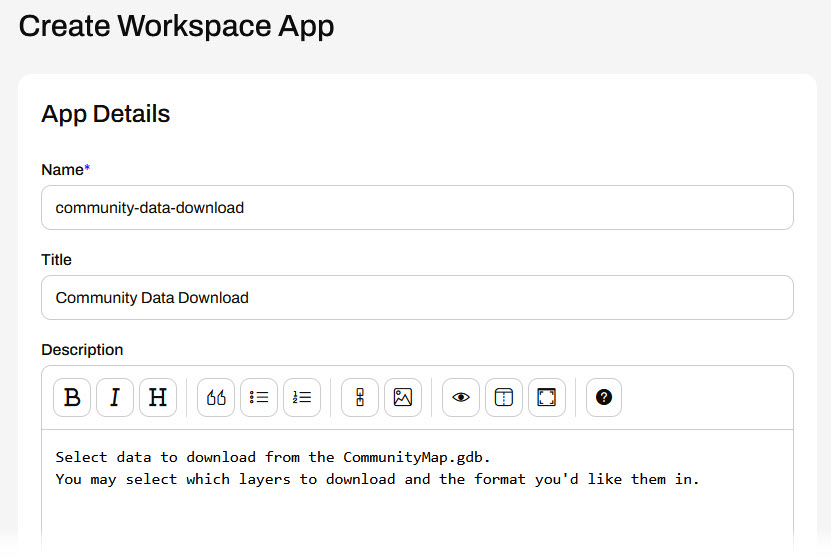
Name the app community-data-download and give it a title and description.
Scroll down and set the app to use the workspace you just published and ran on FME Flow with the Data Download service.
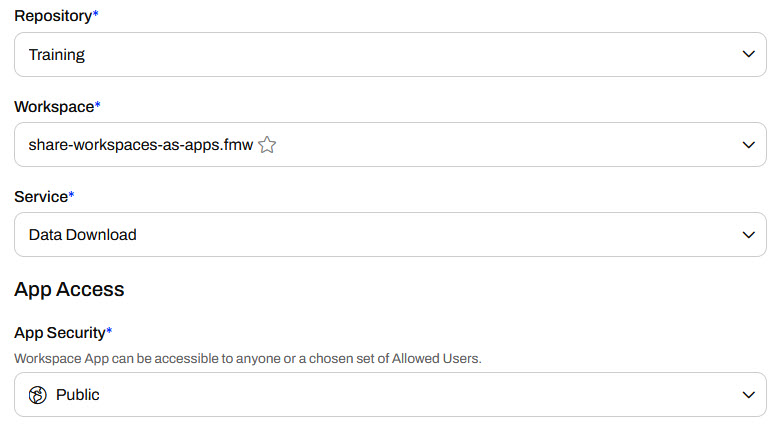
Leave App Security set to Public so you can share the app publicly, and non-FME Flow users can access and run it.
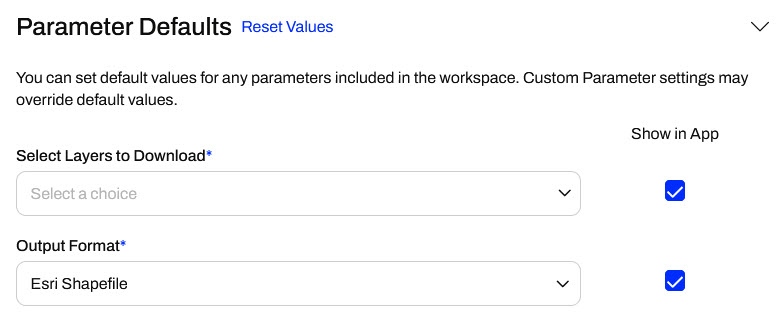
Next, expand Parameter Defaults to configure the workspace's user parameters. Leave both selected to show in the app. Don't specify a default value for Select Layers to Download, and set Esri Shapefile as the default Output Format, since it's likely to be a popular format.
The next three sections are not relevant. Jennifer doesn't need any dynamic parameters, Resource permissions, or app customization yet. For now, skip these options and click Create to finish making the app.
5) Share and Access Workspace App
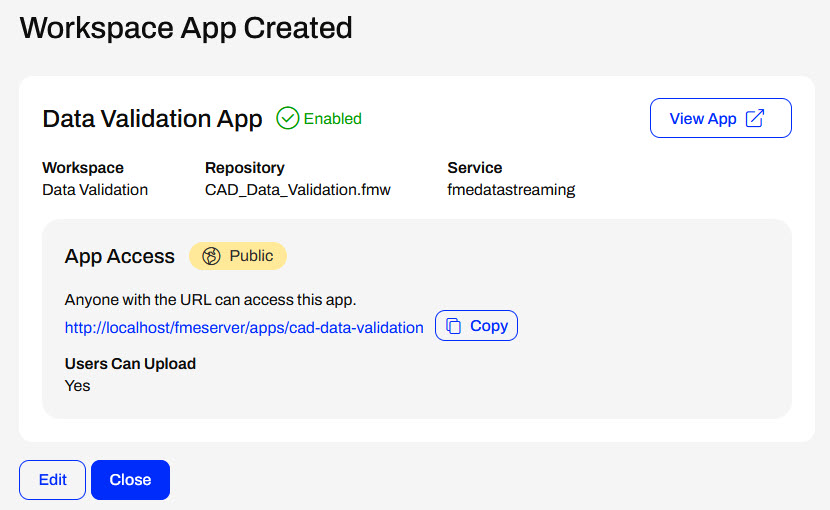
Once FME Flow creates the app, it displays the app URL. Click View App to open the app in a new tab.

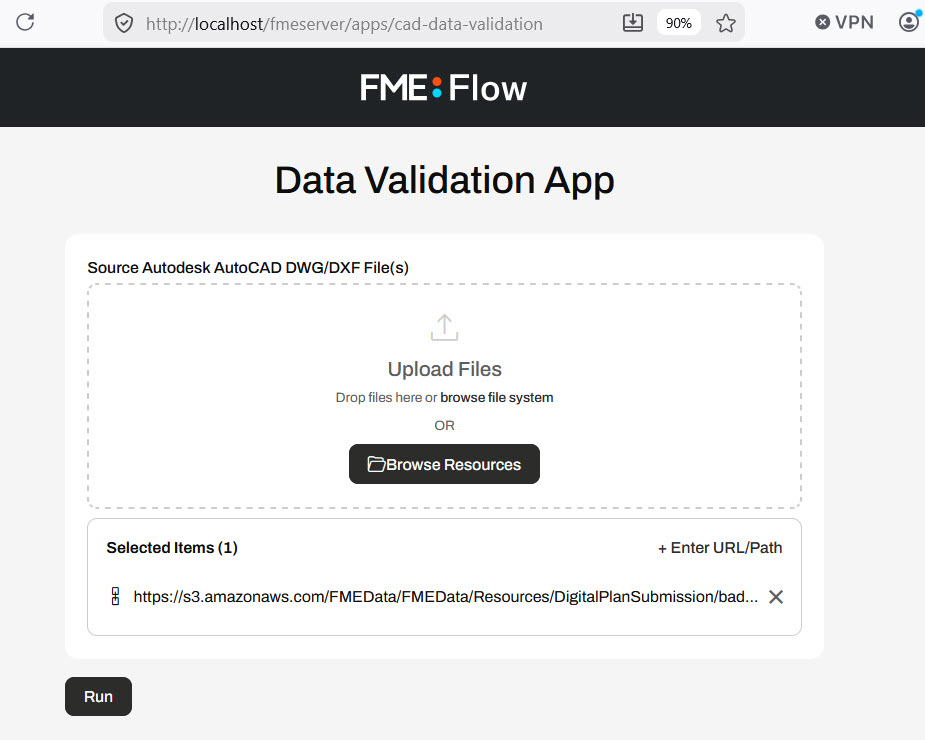
The app opens to a simple web page. Configure the parameters by selecting some layers to download and an output format. Click Run to run the app, which runs the workspace behind the scenes.
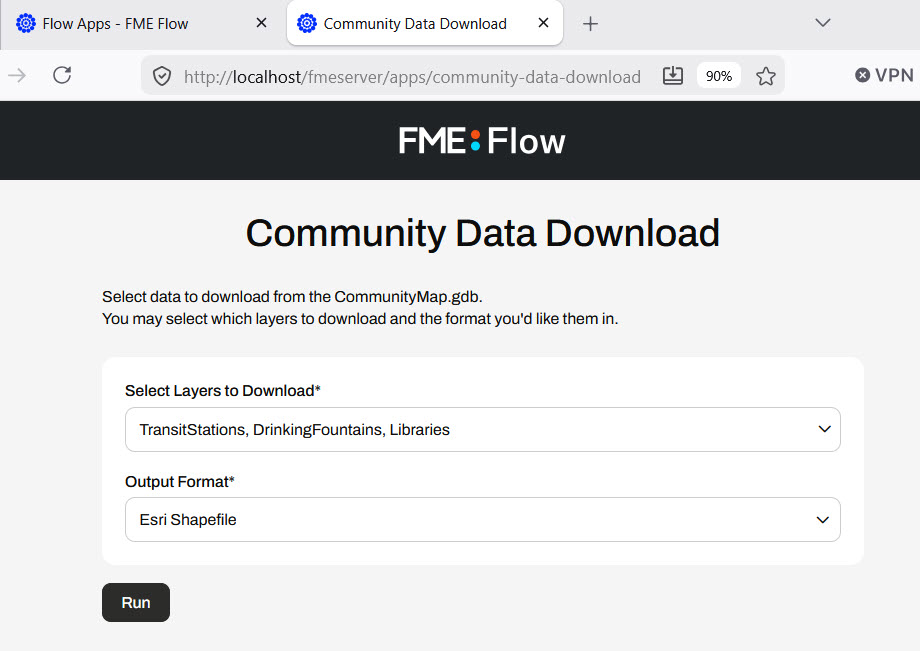
Like running a workspace, the app displays as 'Running' while the FME Engines process it. Once complete, the app displays the Data Download URL. Click the URL and inspect the output data again.
You have successfully created a Workspace App to share FME functionality and data with non-FME users. Jennifer and other users can share, access, and run the app from the URL.
Resources
- Starting workspace | C:\FMEData\Workspaces\DeployWorkflowsWithFMEFlow\share-workspaces-as-apps.fmw
FME Flow Apps
Sharing a repository is an excellent way to share workspaces with other users who also have access to FME Flow. However, what if you want to allow anyone to submit a job without requiring an FME Flow account? Or what if you'd like to control the input parameters a user can submit with a job? Or perhaps you'd like to allow another user to trigger your automation without giving them the ability to edit the automation?
You can accomplish all these using FME Flow Apps, no-code web applications accessed from a web browser that allow non-FME users to access and use FME functionality. Workspace Apps will enable you to share and run FME workspaces as web apps. Workspace Apps are similar to the Run Workspace page, but FME hosts them as standalone web pages that users can access optionally without an FME Flow account. Similarly, Automation Apps will enable you to trigger an Automation. Gallery Apps act as landing pages to link to other Apps and websites.
This lesson will cover sharing workspaces with Workspace Apps. For more information on Automation Apps, see Getting Started with Automation Apps and Job Orchestration in Automations. For more information on Gallery Apps, see Getting Started with Gallery Apps. Check out the Create Data Integration Apps learning path for Flow Apps content on the FME Academy.
Creating Workspace Apps
To create a Workspace App, click Create Workspace App under the Flow Apps menu. Then you'll fill out a form to select and configure the workspace to run in the app.
After you provide your app with a name, title, and description, you must select the workspace and service in which it will run. Workspace Apps can run only one workspace with one transformation service at a time.
Under App Access, you can set App Security to Public or Private. If your app is public, anyone with the app's link can access it without logging into FME Flow, as long as there's no network or firewall interference between them and your FME Flow. If your app is private, you will also need to select the users or roles who can access it. These users will be able to access the app after logging into FME Flow.
The User Can Upload setting controls whether app users can upload temporary data to serve as input to the app. If your app takes source data from end users, you will likely need this setting enabled so they can upload their data.
The Parameter Defaults section displays the workspace's user parameters and lets you set different default values or hide the parameter from users in the app. If the Show in App option is disabled, end users will not be able to alter the parameter setting, and the workspace will run using the default value you provide here.
The following sections are:
- Dynamic Parameter Configuration: Dynamic Parameters let you configure Flow App parameters at runtime using external JSON data. You can set default values or dynamically populate options, enabling flexible app configurations at runtime.
- Resource Permissions: App users may browse and select data in FME Flow Resources to which they have permissions.
- Connection Permissions: If the workspace requires a database or web connection, you may specify which connections app users may access and use to run the workspace.
- Customize: Flow Apps offer customization options that let you upload banners, logos, and icons, add text, or change colors to replace the default FME branding.
This course does not focus on these three sections. For more information and training on them, check out the Create Data Integration Apps learning path.
After you create your app, you may return to it for editing by selecting it from the Workspace Apps page. You can edit almost all app settings after you originally create the app.
Accessing and Sharing Apps
After you create your app, FME Flow will display the app URL and some details. You may copy the URL to share it, open the app in another browser tab, or return to edit the app.
The Workspace App link opens a simplified Run Workspace page where you or your end users can configure and run the workspace.
Exercise
Jennifer is creating a public self-serve data portal for users to access and download data. Jennifer must share an FME workspace with the public to configure and run the portal. However, most people do not have any FME experience, and even if they did, how would Jennifer's organization give everyone an FME account to access FME Flow? To overcome this, Jennifer decides to use an FME Flow Workspace App to share the workspace and make it publicly accessible.
For this exercise, follow these steps to create an FME Flow App to share a workspace publicly.
1) Open Starting Workspace
Open the starting workspace in FME Workbench (C:\FMEData\Workspaces\DeployWorkflowsWithFMEFlow\share-workspaces-as-apps.fmw). The workspace reads data from a CommunityMap file geodatabase and writes it using a generic writer. Jennifer has already created two user parameters: FEATURE_TYPES to allow the user to select the feature types from the database to access, and OUTPUT_FORMAT to control the output data format.
2) Publish to FME Flow
Publish the workspace to FME Flow, put it in the Training repository, and register it with both the Data Download and Job Submitter services.
Publish to FME Flow
Once you build your workflows in FME Workbench, you need to transfer them to FME Flow through the publishing process. To publish a workspace to FME Flow, you need to complete all the steps in the publishing wizard.
1. Click Publish in the FME Flow Connection toolbar. The publishing wizard window will open.
2. Confirm your FME Flow Connection lists the correct connection and successfully connects to your FME Flow.
3. Select a repository to house the workspace on FME Flow from the drop-down options. To create a new repository, click New and enter its details.
4. Optionally, you may Upload data files to publish the workspace's source data files to FME Flow along with the workspace. You can control which files to upload from the Select Files... option.
5. Click Next to move on to the next step.
6. If your workspace uses any connections, the Upload Connections section will appear. You can select whether to publish the connections to FME Flow.
7. Register Services is the last publishing step. Select the transformation services you want your workspace to be able to use on FME Flow.
8. Click Publish.
9. The translation log generates a summary of publishing and provides a direct link to open the workspace on FME Flow.
3) Run Workspace on FME Flow
To ensure the workspace works as expected on FME Flow, go to the Run Workspace page and configure it to run. Use the Data Download service, select a few layers to download, and select an output format.
Click Run, and once FME Flow processes the workspace, click the Data Download URL to download and inspect the data.
Extract the downloaded data zip folder and inspect the data in FME Data Inspector to confirm the workspace runs as you expect, then you can safely turn it into a Workspace App now.
4) Create Workspace App
Navigate back to FME Flow, open Workspace Apps, and click Create to make a new one.
Name the app community-data-download and give it a title and description.
Scroll down and set the app to use the workspace you just published and ran on FME Flow with the Data Download service.
Leave App Security set to Public so you can share the app publicly, and non-FME Flow users can access and run it.
Next, expand Parameter Defaults to configure the workspace's user parameters. Leave both selected to show in the app. Don't specify a default value for Select Layers to Download, and set Esri Shapefile as the default Output Format, since it's likely to be a popular format.
The next three sections are not relevant. Jennifer doesn't need any dynamic parameters, Resource permissions, or app customization yet. For now, skip these options and click Create to finish making the app.
5) Share and Access Workspace App
Once FME Flow creates the app, it displays the app URL. Click View App to open the app in a new tab.
The app opens to a simple web page. Configure the parameters by selecting some layers to download and an output format. Click Run to run the app, which runs the workspace behind the scenes.
Like running a workspace, the app displays as 'Running' while the FME Engines process it. Once complete, the app displays the Data Download URL. Click the URL and inspect the output data again.
You have successfully created a Workspace App to share FME functionality and data with non-FME users. Jennifer and other users can share, access, and run the app from the URL.